...

Mail

Configure your mailbox, schedule sends, and track engagement analytics.

Mail overview

After generating your personalized emails, the next step is to send them out. You can do this individually within the ‘Kraft emails’ section of PitchKraft or set up a schedule in the mail section. This ensures your carefully crafted messages land in inboxes at just the right moment. If you prefer to use your CRM or usual email sending software, then you can export the emails from the kraft emails section.

How to send your personalized emails from PitchKraft

If you are sending the emails from PitchKraft then:

1 – Add your mailbox(es) in the configuration section of mail.

2 – Set up an email send schedule or send emails from the ‘Kraft emails’ section.

3 – View email success metrics in the dashboard section (who engaged, opened, clicked on emails…). You can also segment those who engaged and create a follow-up campaign.

Tips and tricks

Connect your own mailbox to boost deliverability, emails are sent directly from your domain, not a third party. Use scheduling and optional BCCs to control timing, track engagement, and keep internal records effortlessly.

Configuration

Before you can send emails, you will need to head over to Mail → Configuration and connect the email account you wish to use to send your emails. This lets PitchKraft send emails from your very own email domain(s) rather than some third-party server. This improves deliverability. Just add the same details you used when you added your mailbox into other email clients such as Outlook, Apple Mail, Thunderbird, etc..

Tips and tricks

If you cannot find any of the information you need below: ask your email provider for the information. They should have that on their website. Here are some popular providers: Outlook, Gmail, 123Reg,IONOS.Most others can be found here.

Steps to add a mailbox

Mail configuration
1. Host (
mail server)

This is the address of the service that sends your emails.

Example: smtp.gmail.com, smtp.office365.com, or mail.yourdomain.com.


2. Port

Common options:

  • 587 – Most common, works with TLS/STARTTLS.
  • 587 – Most common, works with TLS/STARTTLS.
  • 25 – Standard SMTP (rarely used, often blocked).

3. Username

Usually your full email address.

Example: user@yourdomain.com.

4. Password

The password for your email account.

Some providers (e.g., Gmail, Outlook) may require an App Password instead of your normal one.

5. From email address

The email address that others will see as the sender.

This normally matches the email address you entered in the ‘Username’.
Example: sender@yourdomain.com.

6. Sender name
The name of the person that sends the emails. The emails recipients will see that name. Most use their own name.


7. Choose encryption (use SSL)

Tick this if your provider requires SSL (usually with port 465).

Leave unticked if using STARTTLS (usually with port 587).

8. Click Add

After completing the fields, click the green Add button.

The system will test the details you have added. If successful, your mailbox will send an OTP to the email address which you have set up. This is very important to prevent someone else adding your email address and sending emails on your behalf. Go to your email, find the OTP and enter it. You are now ready to send emails.

BCC email management
If you would like to receive a copy of emails that are sent out, then use the BCC function wherever you send emails. You can create multiple BCC email addresses by simply entering the email address in the BCC email management section.

Domain authentication

This process is optional but highly recommended.

Domain authentication, also known as ’email verification’ is one of the simplest ways of ensuring your emails land in the inbox. A lower bounce rates is almost guaranteed and, because many email senders don’t know about it, you gain an immediate competitive advantage. And it costs you nothing.

Just click on the links in the ‘Domain authentication’ section which will test that you have the ‘holy trinity’ of deliverability in place (SPF, DKIM and DMARC). If you are serious about email deliverability then read the email authentication explainers.

Tips and tricks

If any of the verification tests fail then you can still use PitchKraft to send emails. Email verification is a free service we provide to ensure that your emails end up in the inbox, whether you use PitchKraft to send your emails or any other email software.

Schedules

Tips and tricks

Schedule emails using the recipient’s local timezone for better open rates. Stay within mailbox sending limits by splitting campaigns across days or mailboxes, and monitor replies directly in your inbox for timely follow-ups.

You can send individual emails from the ‘Kraft emails’ section or create timed schedules by going to Mail → Schedules.

To create a schedule, click on ‘create schedule’.

1 – Sequence name: give the schedule (also known as a sequence) a name.

2 – Campaign: select the campaign you wish to send emails from.

3 – From: choose mailbox to use to send the emails.

4 – BCC email: add an email address to receive copies of the emails (optional).

5 – Timezone: choose the timezone that the ‘Scheduled time’ will use. 

6 – Scheduled date: select the date you wish to send the emails on

7 – Scheduled time: select the date you wish to send the emails on

 
The schedule will be saved and you can edit or delete schedules anytime.
 
Once the send is triggered (at the scheduled date and time), PitchKraft takes each personalized email for that campaign and sends it via your chosen mailbox.
 
Because PitchKraft uses your mailbox, any sending limits are those of your provider. Typical limits are:
  •  Gmail standard accounts: ~500 emails per day.
  •  Google workspace (GSuite) accounts: ~2,000 emails per day.
  •  Office 365: ~10,000 per day (varies by plan).
  •  SMTP servers (custom): depends on your server settings.
If your campaign exceeds these, then the server might start rejecting sends after the limit is hit.
recommendation: If you have more emails than your daily limit, use multiple mailboxes or split the send over multiple days. It is also advisable to warm up your email addresses (contact us to learn more).
 
Since emails are coming from your address, any replies from recipients will go directly to your email inbox (not into PitchKraft). That’s by design. You correspond with them normally.

Dashboard

After your campaign emails have been sent, the dashboard becomes your command center for monitoring engagement and results. These analytics let you gauge the effectiveness of your outreach and can guide your next steps, like who to follow up with.

Accessing the dashboard

Click on dashboard in the left menu and then select one of your email campaigns to see metrics. By default, the statistics will show for all dates for that campaign unless you filter using the start date and/or the end date controls.

At the top of the Dashboard, you will see high-level metrics. These include:
 
  • Sent: total number of emails successfully sent (for the time frame or campaign currently viewed).
  • Unique Opens: the percentage (and raw number) of sent emails that were opened at least once by recipients. Example: “Open Rate: 52% (182/350)”.
  • Clicks and Unique Clicks the recipients who clicked a link in the email. Example: “Click Rate: 10% (35/350)”. This counts unique clicks (each person counted once even if they clicked multiple times).
These metrics are also shown as a line graph below the metrics on the Overview tab, showing sent, opens, and clicks over time.
The data in the Dashboard is actionable:
 
  • High interest contacts (opened many times or clicked): prioritize reaching out to them with a follow-up. Perhaps give them a call, use the PitchKraft LinkedIn summary of the email to use in a LinkedIn message or contact request, or send a shorter follow-up email with the full email trail, right from within PitchKraft.
  • Moderate interest (opened once, no click): They read it but didn’t act. Maybe they’re interested but busy. Consider a follow-up in a week.
  • No interest yet (no open): It’s possible they ignored it or it went unseen. You could try a different approach in a follow-up.
  • Tracking conversions: If your email links to a sign-up page or something with conversion, you should see those conversions in your own system (like webinar sign-ups). Match those against who clicked to gauge conversion rate.

Tips and tricks

Use the Dashboard to spot high-intent contacts quickly. Prioritize follow-ups based on opens and clicks, test new subject lines for non-openers, and let engagement data guide smarter next steps.

Switching to the Details tab will give you granular data of the actual contacts that engaged.


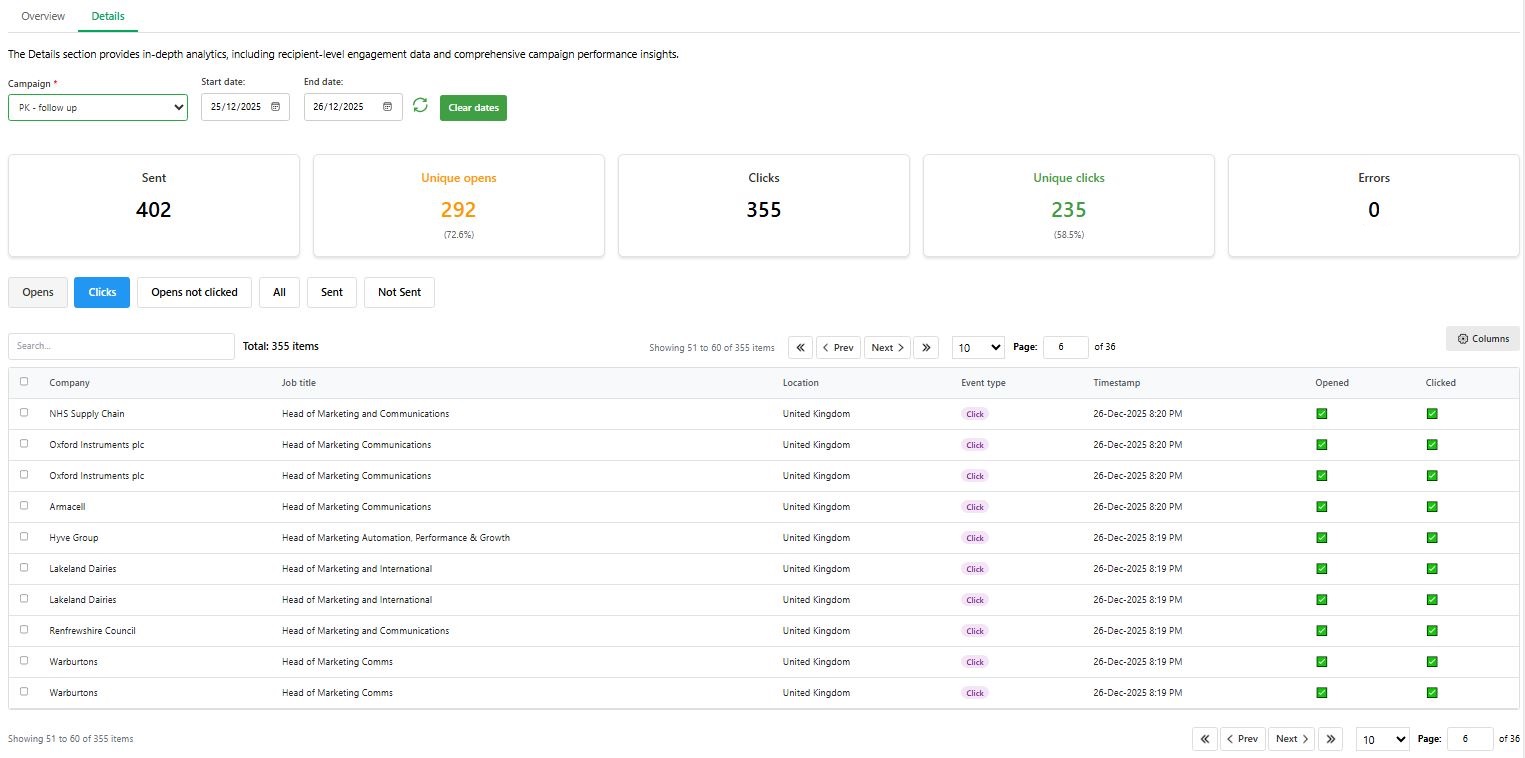
Here you can see each contact and their interaction. The table shows such information as Contact name, Email address, Company, Job title, Location, Event type (Open, Click), Timestamp (last event date & time), and others.

Click on the Opens button to filter by all contacts that opened your email, the Clicks button to show all the clicks, Opens not clicked, All, and Sent.

You can create ‘segments’ of the ones you are interested in to send follow-up emails later.

Celebrating your success!

Don’t forget to celebrate your wins! If your campaign performed well, that’s a direct result of your effort combined with PitchKraft’s technology.  Many users see substantially higher reply rates when using PitchKraft compared to generic outreach, and you might already be experiencing that. Share the success with your team. Let us know. We love testimonials and could feature your story to help boost your brand.

By now, you’ve learned how to manage contacts, create blueprints, generate personalized emails, send them, and review engagement. You’re equipped to run sophisticated email campaigns that feel warm and fantastically hyper-personal to your future customers.

Tips and tricks

Celebrate strong results with your team and reuse high-performing campaigns as proven templates for future outreach.

This will close in 0 seconds

This will close in 0 seconds

This will close in 0 seconds